26 May 2015

Bridal Hair Class with Ayangkamell


I've been wanting to go to Ayangkamell's Bridal Hair Class for a while now. I really love all his bridal updos and it is one of the many reasons why it made me follow him on his social media pages.  I attended his makeup class before, organized by my partner-in-crime way back then, Awin. It was a very enjoyable and an eye-opening class. 

I know there are a lot of talented makeup artists in Malaysia that have great makeup and hairdo skills, but among the reasons why I like Ayangkamell's style is because he has a very nice flair when it comes to updos, and his style is both simple and elegant. I swoon everytime he uploads any of his work on Instagram (stalker, much? :P). Hehe..

Anyways... After a while, the time was right for me to join his class so I asked Zam aka Alkazam Da Cute to register me for this session. 

I always look at Ayangkamell as one of my sifus, but he is so down to earth that he treated all of us in the class not as students, but his colleagues, peers. For someone with 20 years in the industry, he wasn't stingy with his experience at all. He simply shared with us. All questions were answered best to his knowledge. 

The class was structured to have two sections: theory and practical. He covered all the basics to doing bridal updos and products he uses while on the job. He shared the tools, the brands, where we can get it, who should we ask for, etc. Like I mentioned, he just gives. The theory ended with a demo on how to achieve two different buns: high and low. I really appreciate the explanation on how he execute every step of the process. 

Next, the practical! I was sweating hahaha.. We had to do both high and low buns so he could give us feedback and points for future improvements. I started with the low bun first because I thought it was easier. Well, not at all. The demo seemed so easy and straightforward. But there I was, sweating like crazy. But I did manage it with the help of Ayang and fellow participants. Fuuuhhh!!! Moving on to high bun. I knew it wasn't gonna be easy so I was prepared for the worst. But again I managed to pull through with Ayang's help. 

Thank god for this practical session. I get to see how different different type of hair required different preparation and it would bring different outcome. In this section of the class, Ayang went around the room correcting or improving our techniques. I also got to ask him different scenarios when dealing with updos. And of course he entertained to all of my questions. 

I really appreciate the structure and contents of this class. It has a good context, really manageable modules and easy to comprehend. I think what makes it so engaging is the trainer himself. Thank you Ayangkamell for being so generous in your class. I am truly grateful to have an awesome sifu like you. 


16 May 2015

Latest Works

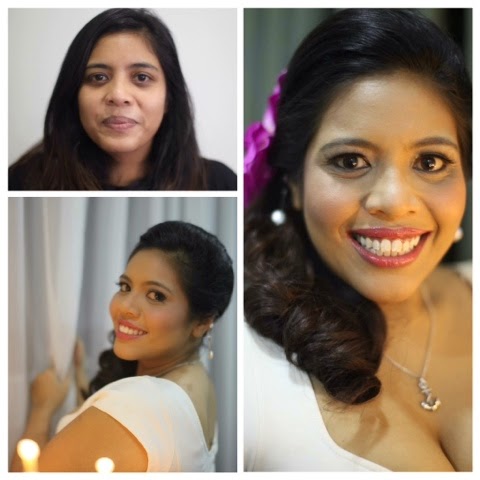
Here are some of my latest makeup and hair works. 

These photos are taken using Panasonic Lumix GF5. Aside from cropping and collaging, no photoshop or enhancement of any kind took place. 

Come visit my Facebook Page for more pictures!

13 May 2015

Stage / Character Makeup Workshop @ UTEM

remember back when I was in university, all students were required to take co-curriculum subjects as part of the requirements to graduate. And I remember the only exciting thing that was offered was Gamelan. I tried to recall what other subjects offered, but they were not memorable at all. The first semester it was offered, I didn't get it, as I sent in the application quite late during the day, I think. So I ended up with something I can't share with you all, reason being, I simply don't remember... The following semester I was determined to get it, so I submitted my application first thing in the morning.

And I got it! I was so happy and I really enjoyed that class. Now I can't play any Gamelan instrument to save my life, but back then, I could play quite decent. I passed the test with flying colours to boot!

That's why when I was invited to teach for a Theatre class at Universiti Teknikal Malaysia Melaka (UTEM), I was so ecstatic. Why didn't we have this back then? It would be such a fun class to be in.  Don't you think?

On the day that I taught, the class started out with some rehearsals of short plays that the students prepared for their assignments. Also while waiting for the rest of the class to arrive. This part have not changed much from my uni days.. Heheh.. Anyways, I got to see some of them in action, which was quite impressive. It showed that they were committed with their assignments. Some were funny and some were serious.

I was given an hour slot for my workshop, which is quite short for stage makeup class. So I shared what I thought the most important tools to know and quite useful for quite a lot of different character makeup - the light theory also known as contouring and highlighting. So I covered the theory part, had a quick little demo on the lecturer, and let the students did the contouring and highlighting on their own faces. All in under an hour! The students were given 30 minutes to do their own makeup, and their task was to make their faces to look like old folks. Heheheh...

During demo


I had an enthusiastic group of students on that day, so once given the tools, they were well on their way to old age. Haha.

They were really into it.. 
Comparing fine lines and wrinkles


Over all, I was so happy to have such sporting group of students to teach on that day. They were all so friendly and very eager to try. I even gave them grey hairs just to make them look realllllyyy old!

Say hello, grandpa!
Funky gramps with spiky hair :)
How sporting are they to try this unflattering makeup on their faces??

For more photos from the class, please go to my Facebook page. Till next post, bye bye!

I was the 'youngest' in this group photo. Love it!


12 May 2015

Exciting New Services Added!!


So excited to announce that new items have been added on my services list!

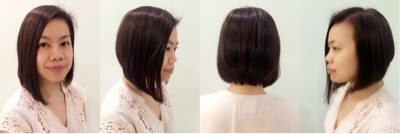
These new services are added with my bridal customers in mind, as they have a million things to do for their big day. For your convenience, I have enlisted the help of a professional hairstylist with over six years of experience working in one of Malaysia's leading hair salons.

The new services added are pre-wedding hair services to cater to both the bride and groom's needs. Why not have your hairstylist come to you for hassle-free services in the comfort of your own homes.

Go here to check out our pre-wedding hair services packages!

Before

After
After
    

Before
After


Before
After


05 May 2015

Mary Kay's Paradise Calling Collection

Last month, Mary Kay launched Paradise Calling, a new makeup collection inspired by the summer beach holiday. The makeup collection consists of three eye colour, three lip colours and four nail colours. I have looked around and there's also a moisturizing spray lotion that are not available in Malaysia. Being a makeup junkie that I am, I got myself all the eye and lip colours!

The lip colours are called Lacquered Lip Shine and they come in three shades; Sunbaked, Tropical Mandarin and Exotic Orchid. The eye colours are called Whipped Eye Colour and they come in three shades; Seafoam, Tiki Hut and Lagoon. 


The lacquered lip shine comes in a 6g tube, is moist and has a very high shine, without leaving me feeling too sticky. I am so loving the playful lip colours which really scream summer. 

The  whipped eye colour is in a very big pot of 5g and has a mousse-like consistency to it. It's very easy to blend using a fluffy brush or any small blending brush. It is also good as an eye base. 

Overall I'm very very happy with this collection, hmm, didn't try the nail colours though. Hehe..

Here are some of the looks I have created using this collection. Enjoy!!


Leave a comment below if you're interested to give them a try! 

01 May 2015

My Secrets to Flawless Looking Foundation

I used to wonder - when looking at magazine covers or editorial photos - how does the skin look so smooth and gorgeous without looking like there's a lot of foundation being put on? Trust me it's a lot going on the face. Especially when it's for printing or video. 

I love trying out makeup on my face just so that I can experiment on different looks and colours. You can see them all on my Instagram account. I have been experimenting with skin for a long time now and only for the past few of years I got it almost right. Why almost? Well I believe there are an abundance of tips and tricks out there and what I have discovered may not include all of them. 

It starts with the skin
Who doesn't want flawless looking skin? But how many really are willing to invest in taking care of their skin? If you want your foundation to look 'like skin' or 'flawless-looking', you have to look at the foundation of your foundation. Your skin. If the skin is already taken care of and is in a good condition, it doesn't take a lot of makeup to make it beautiful. Makeup will only enhance it. How to take care your skin? That topic deserves a post of its own. 

Well moisturised skin
When your skin is well moisturised, the foundation will blend nicely on your skin. In a way it clings on and it will stay longer as well. That's why it is important to understand your skin type so that you can use proper moisturiser for your skin prior to putting on makeup. Even if your skin is oily, moisturiser is a must. Look for oil free or gel type moisturiser. For dry skin, you can use the more creamier type. 

Is foundation primer necessary
Yes and no. Nowadays a wide range of primer has been developed for many reasons - to smooth the skin, to give sun protection, to correct colour, to give radiance - just to name a few. In that case you will have to look at the needs of your skin. The use of primer also helps the makeup to stay on longer. Some primers have multiple purposes so you get more mileage with the use of a single primer. 

That being said, sometimes I skip primer when I am using my CC cream for daily use. Or when I only need the makeup for only a couple of hours, like when going out for dinner function. 

Choose the right colour of foundation
It is crucial to match the foundation to your skin. Not lighter, not darker. The effect of foundation is to make your skin to look even toned, not to make your skin fairer than it is. With the contouring hype going on right now, I would recommend to get the shade of foundation that matches the highlight tone of your skin. What's the highlight tone you ask? Our face is normally not one colour all over. Some parts are lighter and some are darker than the others. So you can look at your forehead or the top of your cheeks for the lightest colour of your skin.  If you want to contour, choose a shade or two darker, and blend well to make sure the effect is soft and subtle. That way your face will look neither too made up nor too flat. 

Setting the foundation
When you're using cream or liquid foundation, depending on the formulation, you will need to set it to stop it from moving. Yes it can move. Some liquid foundation however can set on its own after a while. So choose the right setting powder for your foundation. If you're looking for a lot of additional coverage, you can use two-way cake. Otherwise, sheer pressed powder or loose powder will give a slight add-on coverage. I personally prefer to let my foundation set on its own for dewy finish. If I want a matte look, then I will use the translucent loose powder, which will not alter the foundation colour at all. My favourite foundation at the moment is Mary Kay matte-wear liquid foundation which has the coverage and finish that I love. It will set on its own without using any powder. 


So I hope this sharing of mine is helpful for you. Happy experimenting and playing with makeup! 
Related Posts Plugin for WordPress, Blogger...